Friday, November 25, 2011

Thanksgiving Day!


Oh I love Thanksgiving!  I spent it with my awesome boyfriend and his amazing family!

So since I've known his family, it seems like this is their their Thanksgiving tradition:

1.  Macy's parade is on the TV, and we pay special attention to the dog show.

2.  Huge, yummy, crazy awesome, food-coma-inducing lunch:  two turkeys (one fried one roasted), mashed potatoes, sweet potato casserole (with the crunchy pecans and brown sugar top), ham or roast duck (sometimes both), marshmallow and mayonnaise casserole, green beans with bacon, pineapple and cheese cracker casserole, cornbread dressing, dirty rice dressing, white rolls, homemade apple pie, store bought pumpkin pie, some other homemade pie.  Did I leave anything out?  Sounds around right for six people right?

3.  Christmas decorating!  So part of this would be decorating gingerbread houses or trains.  I took over the train this year because when I am too stuffed to eat the cookies, icing, and candies, I still love playing with it!
These are the supplies Ms Sherry got us started with =) 
Yes, the gingerbread was pre-made (if you were to bake them on your own you have to ensure to bake them in advance to allow them to cool and harden prior to decorating and standing your train up.  The candy-canes were full of round and oval chocolates - which I did not end up using because they seemed bulky and heavy and I was afraid the icing would not succeed in holding them up.  But otherwise, the gingerbread train kit came with several mints, gummy candies, candy balls, and icing.  I did not personally taste any of this because I was very full already, but I was told the cookies were tasty!

The first car:


Since these are the first cars that I made, there is still some experimenting involved because its been a year since I last decorated gingerbread!  My biggest problem with these first two cars were that my hands were not quite warm enough and thus my icing was cooler than it should have been - meaning it solidifies a lot faster.  In this case, if you do not stick on your candies fast enough the icing will just crack when you place the candies on!  I  quickly learned that I have to "massage" my pouch of icing a little longer so that I have more time to decorate with candies before the icing solidifies. Of course you do not want to warm your icing up too much because if it is too runny it will not allow you to form well-defined lines.

The second car:  


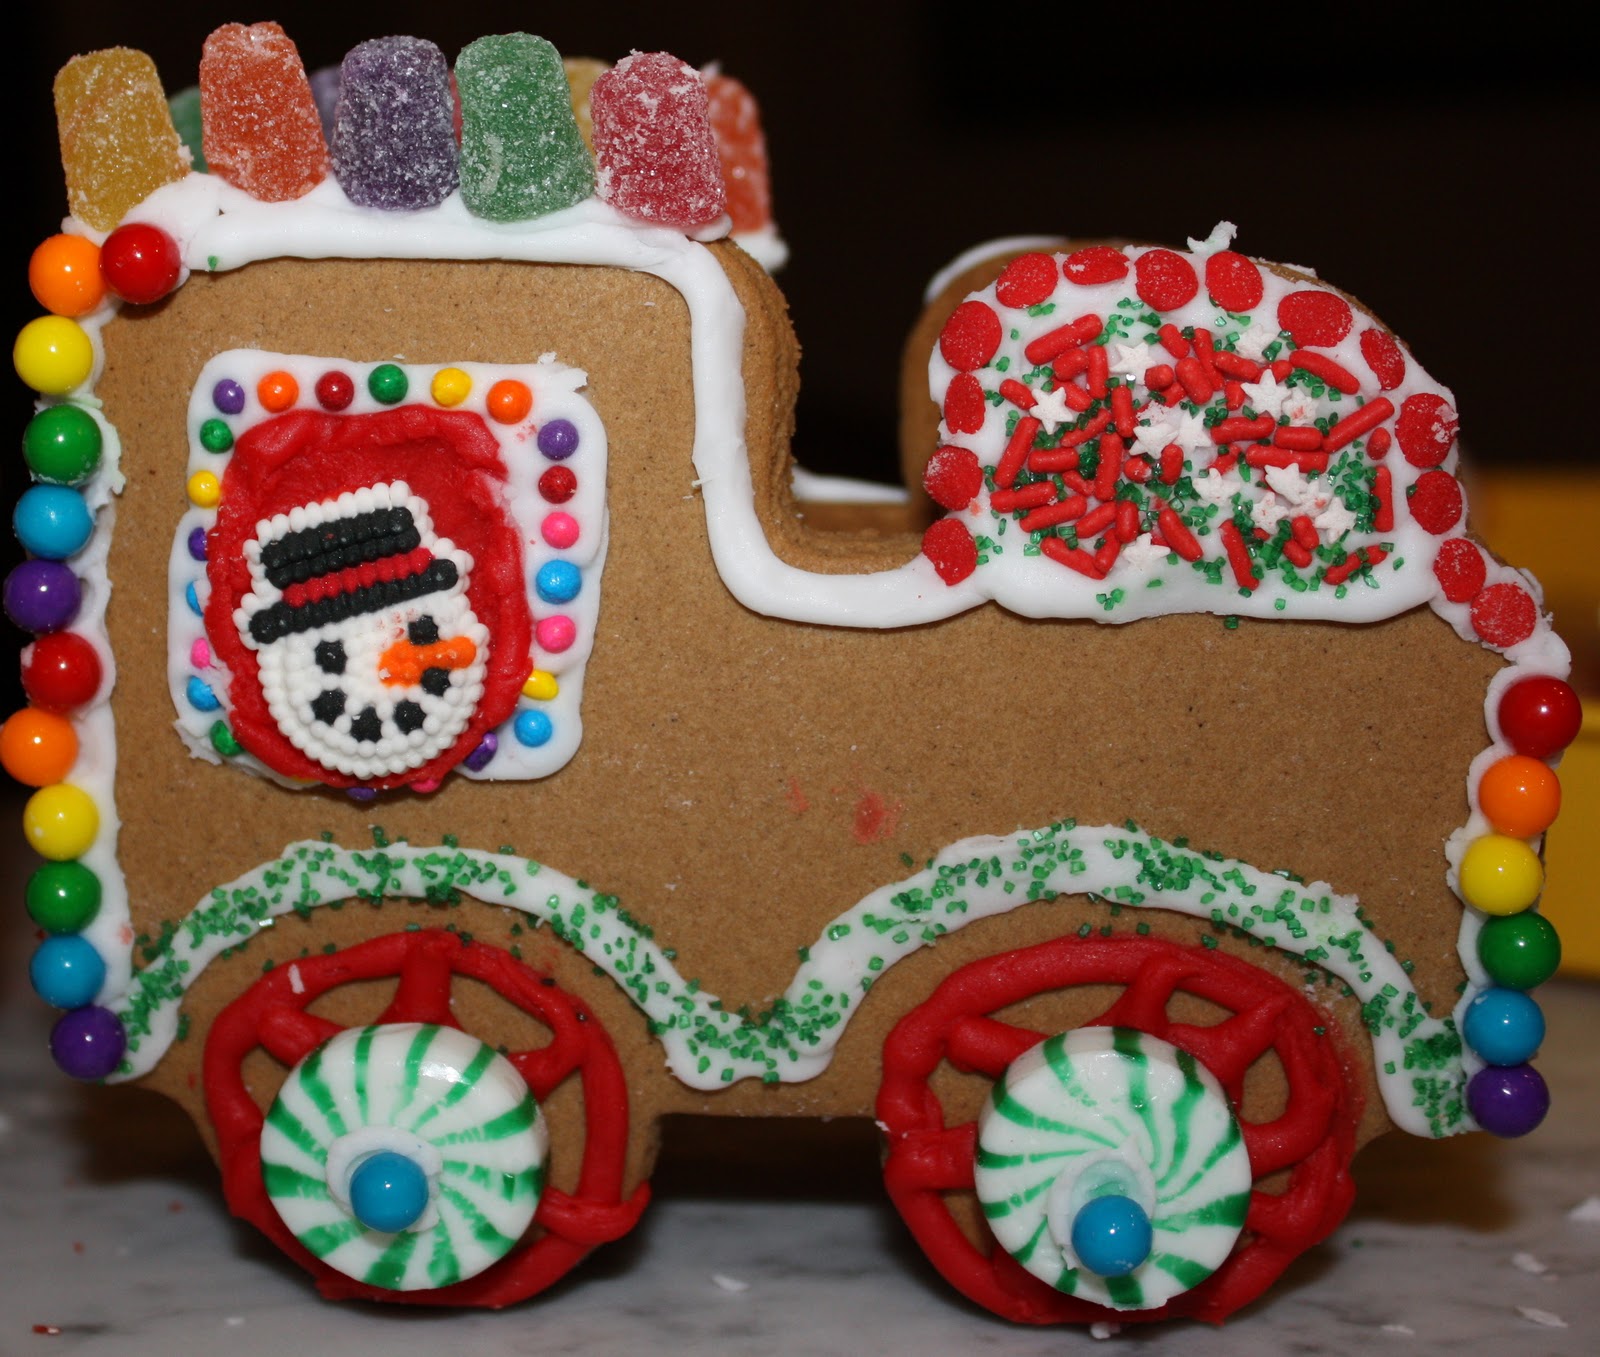
The red and green backgrounds were done with the colored icing sugar crystals in the jar of icing (use a knife to spread a thin layer of icing on the gingerbread and then pat down some colored icing sugar crystals to the area).  The ornaments on the green car were merely pre-made sugar "stickers" that you can stick to your car with icing sugar.  The wheels are once again mints with a candy placed in the middle to make the axle.

The third car

The little Christmas trees on the tip-tops are one of the sprinkles that comes in the bottle of sprinkles separate from the gingerbread train kit.

The presents are once again pre-made sugar "stickers"

Its very tempting to start building the gingerbread house/train/whatever the first thing after opening the packaging but do try to refrain from sticking the sides together to stand up the cars until AFTER you have decorated each side! - Much easier this way because you can look down flat at all your sides while you decorate, and your candies won't slide down before the icing sets.  

After you do finally build the structure and stick it together, make sure you let the gingerbread structure rest in place for a while before you move it.  And If you intend on keeping your gingerbread as a decorating for more than one season (and of course if you have no intentions on eating it), then you can spray it with shellac (you can buy it from the craft store or Home Depot) so that the structure and color preserves.  Make sure you do your shellacking outdoors in a well ventilated area because that smell is not pleasant (nor is it salubrious)!

4.  The last thing in the Thanksgiving tradition: SHOPPING!!!  (on Black Friday... and that is why I did not blog about this yesterday when I actually made this!)  Hope you caught some great shopping deals!  And of course, check out my lil-shop if you like my stuff:  http://www.etsy.com/shop/HandMadeByEle

Wednesday, November 23, 2011

Beads and Belly

http://www.etsy.com/listing/86901287/blueberry-candy-cane-bracelet?ref=v1_other_2
I LOVE THANKSGIVING.  I really do - despite how my pictures make it seem as though I am one who glosses right over Thanksgiving and start celebrating Christmas!  I saw videos of how some people make little tiny clay pumpkin pie beads, or little tiny pumpkins, but ... really?  By the time I experiment enough with clay and make something that looks like a  pie, Thanksgiving would have been long gone.

I got those little glass candy canes from FireMountainGems.com and they are the cutest things!  I have learned (the hard way?) that shopping online for jewelry supplies can be a hit or a miss though.  Sometimes things comes just as you would imagine but sometimes quite disappointing...  For instance, my spool of half-hard 20 gauge sterling silver wire: I bought it because after reading reviews and blogs, I have come to the conclusion that this would be the perfect type of wire to twist into wire words (which look really cute as a pendant for a necklace).  But then the wire arrived in the mail, and 20 gauge looks way too thin, I don't think it pops enough for what I was originally planning to do with it.  But hey, I am sure I will find a use for it =)

But today is about beads AND food because I have been lagging in the cooking department lately and my boyfriend who cooks gourmet meals daily made fun of me for my lack of effort.  Thus, I took up his challenge to make a better pork belly (because it has become our latest favorite dish) than he does because I/we are competitive like that.


Yup, I made that.  And taking pictures of it has somehow gotten my camera greasy.  It is as delicious as it looks.  I was thinking about allowing the picture to be larger but I figure people who click into my blog to look at crafts and beads may be put off by a big hunk of pork belly.  Anyway, you can read about how I made it on my boyfriend's blog: http://saltpepperandthyme.blogspot.com/2011/11/pork-belly.html

Sunday, November 20, 2011

Beginning of Christmas Season

http://www.etsy.com/listing/86480428/snowflakes-and-candycane-hearts
So a  lot of people on Etsy have long ago already started selling Christmas stuff, so I figured I should try to make some Christmas-themed stuff too!  AND because I really love Christmas and has been looking forward to it since June!

I totally wish I could wear the Christmas jewelry but I can't start sporting Christmas stuff until after Thanksgiving!  I still have lots of glass candy cane and some pewter Christmasy charms that i have yet to work with, so there will be lots of Christmasy stuff coming out in the next few weeks.


http://www.etsy.com/listing/86479220/christmas-hempclay-bracelet?ref=v1_other_2
This blue snowflake bracelet however... 


I really do like this bracelet, but I can't seem to get a good picture of it.  I took so many pictures but this is the only one that came out all clear.  Something about the textures of the beads and how light bounties off of them is just not agreeing with me or something.  Until I can get a better I cannot post this item up because I just feel goofy posting pictures even I think are bad up on Etsy!

Wednesday, November 16, 2011

Package in the Mail


Got a big package at the door step while I was at work today!!!  I love coming home after a long day and getting a mailed present from me to me:  jewelry making supplies (and yes I made sure they included my miniature screw driver!)!

There will be lots of fun to be had in the next few weeks!

Tuesday, November 15, 2011

Visibility

http://www.etsy.com/listing/86121172/glass-mushroom-pendant-on-mother-of
So I have opened shop on Etsy for over a week now... I know from research that it usually takes a long times (at least a few months) before people actually starts buying your stuff, but I am annoyed that no one was even clicking and viewing my stuff.  I did a few changes in the last couple of days so now I actually have a few views and a few "admirers"!  I am very excited!  Knowing someone wanted to take a closer look and knowing someone appreciates something you made just really warms a person's heart!  Its good to have an affirmation that your art/creations isn't going unnoticed and isn't just swallowed by some giant void in the world wide web.  So here are some tips about increasing visibility so that you can get some warm fuzzeis too:

1.  Make sure your first picture (the one people see before they even click in) is very eye-catching: Ensure that you are zoomed in quite a bit so that people will want to click on your item.  Use bright colors, bright lighting, make it zoomed in and focused on the feature of your item.

2.  Use your tags: Even your friends you ask to check out your shop cannot find your items if you tell them to search your shop name on Etsy (something I think should be changed)!  So on your tags, make sure you include key words that people will search when they are online shopping.  Today I am experimenting with putting my shop name "HandMadeByEle" as one of my tag words, we will see how that goes!

3.  Be involved in the Etsy community:  Add people to your circle and give other sellers feedback if you love their items or love their stuff!  People will see that you added them to your list and they will in turn become curious about you and your shop.  I am not sure how other websites work but with Etsy the circles, favorites, and admirers really will help boost your visibility.

Good luck with your shops!

Monday, November 14, 2011

How to Make a Friendship Bracelet with Hemp


I made this friendship bracelet today while watching some old episodes of The Office (Michael just started his own paper company!).  I find braiding these friendship bracelets fun and calming... And it makes me feel ultra zen because I am braiding natural material into jewelry and thus feeling extra eco-cool!

Here are the steps:

1. It is probably easiest if you choose two different colors to begin with because it will be easier to identify which string belongs to which set.  But once you become familiar with braiding this braid, you can always make the bracelet using the same color of string.

2.  Cut out one long strand of each color:  Generally you would want each strand to be 4x the desired length of your bracelet.

3.  Align your two colors of strings together, fold it in a half, and at the half mark tie a knot:

You can use the knot as a button loop at the end so that one end of your bracelet will have a big bead (like the bright pink mother-of-pearl bead I have in the pink bracelet up top).  But while you are making the bracelet, you can also look the knot onto a safety pin and pin it somewhere to stabilize your bracelet as you braid.

4.  
Strand 4 goes under 2 and 3
5.
Strand 4 goes under 2 and 3 once again
6.

Strand 1 goes under 2 and 3
7.  In the next loop strand 1 will go under 2 and 3 again, but you basically repeat the same loops.

Strands 2 and 3 just remains in the middle throughout the entire bracelet for this pattern,
it is only strands 1 and 4 that moves and round.  So to recap:  
Loop 1: Strand 1 goes under 2 and 3
Loop 2: Strand 1 goes under 2 and 3
Loop 3: Strand 4 goes under 2 and 3
Loop 4: Strand 4 goes under 2 and 3
Loop 5: Strand 1 goes under to and 3
Loop 6: Strand 1 goes under to and 3

Loop 7: Strand 4 goes under to and 3

Loop 8: Strand 4 goes under to and 3
See the pattern?


8.  Now, if you want to add some beads in the bracelet like I did in the pink bracelet, you can string strands 2 and 3 through the bead and slide the bead up to the last knot created by strands 1 and 4, and then continue to loop strands 1 and 4 as usual underneath the bead.


Saturday, November 12, 2011

First Impressions

http://www.etsy.com/listing/85578050/cherries-and-christmas


The above pictures are taken of the same bracelet.  The photos are taken with the bracelet on different backgrounds.  It wasn't until I have viewed my own items on Etsy amongst other Etsy listings did I know how horrible my photos were.   There are billions of listings on the website, and when I saw my own listing in the midst of the 20 other listing on the 10th page of items I thought "Oh my goodness, my stuff looks invisible even while in plain sight."

I guess until I started online selling, I didn't know how difficult it to was grab a buyer's attention because I buy so much stuff online so easily... Turns out there are billions of people trying to selling similar products online!  So to be viewed, that mug shot of your product better be  ATTRACTIVE or its beyond ignored.

I am sure I still don't have this photo taking science down because I am not getting many views on my items.  (Kinda a bummer!)  But within 2 days of starting to post stuff on Etsy I realized one of my hugest mistakes was to not zoom in enough on the product.

Most people are use to taking pictures to capture occasions and experiences.  So lets say you are traveling to Greece: You'd want a picture taken with a lot of the background visible to capture what you experienced during your trip, right?

Thats something you quickly have to realize to stop doing when you are trying to sell stuff online:  No one cares about the backdrop!  Kind of obvious why right - that you need to grab people's attention with the visualization of the actual item for sale?  Well, I didn't think of it until I glossed over my own items while online shopping.

So, my lesson number one was to ZOOM IN and FOCUS.  (Because we online shoppers are all too A.D.D. to do it on our own?!)


And then the second thing I learned about this type of photography is lighting.  Many websites I read have said that to get a great picture you must have lots of natural lighting.  But I somewhat disagree.


The above and below picture are the exact same picture: I took the picture of the bracelet indoors beside a well-lit window against a white cloth.  The above is the original photograph and below I increased the exposure and cropped it to zoom in more.

http://www.etsy.com/listing/85810444/wiry-braided-bracelet
Now, below is a picture I took of the same bracelet outside that same windows.  I found that it was too bright when I took the picture outside the same window - it casted too much shadow and actually took away the appeal of the bracelet.


I even tried playing with the exposure of the outside picture for a while but that turned out okay... 

In my opinion, the most attention-capturing picture of the purple bracelet was the second picture - when I took the picture indoors and increased the exposure to brighten it up.  I did this with several items and found that I still liked the picture the most when I took it indoors and just increased the exposure.  I think the pictures taken outside on a sunny day just features too large of a shadow making the picture "pop" less (for lack of better words).

My next experiment will be to try taking the picture outside on a cloudy day - maybe this will have a great effect too.

Friday, November 11, 2011

Dear Pets


I had to go to work today (7am-7pm)...  The ability of cats to jump to high places and get into small places has allowed my kitty cat to get into my jewelry supplies box.  Of all the things in the box, the only thing he chose to do was to unravel and chew up two big spools of hemp.  I guess the cat-loving-yarn thing isn't just something the Garfield guy made up!

Note to self: Do not leave spools of anything lying around.

Thursday, November 10, 2011

Playing with Wires

So I just spent several days compiling a big shopping list, loading my virtual shopping cart and finally checked it all out yesterday.  Now all I have to do is wait for my big box to arrive before having more things to experiment with.  Meanwhile, I still have that little box of limited start-up jeweling supplies that I bought a couple weeks ago.  Thus, the topic of today will be wires!

I am really liking wires.  They are colorful, doesn't fray, shiny and makes the jewelry pop!  And I imagine it takes a lot for the wire to fade so your jewelry will keep its color and luster.  I lucked out when I chose this one-tool-does-all thing when I bought this pliers/round-nose/wire-cutter/loop-closer tool when I haphazardly selected what I should include in my start-up stuff.


This is my first wire bracelet:  I think it looks pretty cool even though the lack of views on my Etsy account fails to support my opinion!  And its neat because the wire will let you bend and readjust the bracelet size with a 2cm leeway yet the pattern and overall shape of the bracelet will stay intact.


http://www.etsy.com/listing/85810444/wirey-friendship-bracelet

Perhaps there are other tools out there that I still need, or maybe some metal gloves because as awesome as that tool works, my finger tips are still a little bit sore after making several bracelets


So now I am just waiting for my half-hard wire to arrive so that I can start making shapes, letters, and names with wire!  Keep checking back because things will get more exciting when my big box arrives!

Wednesday, November 9, 2011

Trials, Errors, and Creativity

Since I am only weeks into jewelry making, I am doing a lot of experimentations with different textures and products to find what would allow me to produce jewelry I could try to attempt to sell on my newly opened Etsy.com account.  I have only put on 5 of the 50 things I have made because .... *sigh*.... not everything is a winner!  My account is HandMadeByEle (are you shocked) if you are interested in taking a peek.

So today, I began to play with stainless steel wires.  The picture on the left looks blurry right?  Well, its not blurred: the wire comes wrapped up in plastic such that I had to carefully glide a pair of scissors through its entire length of 5 feet of wire to get to the stainless steel.  I don't understand the purpose of the packaging... if someone knows, please indulge me, thanks.

I had chosen these tiny little clasps to go on the ends of my wire for the bracelet I was making.  That is my 5 pound kitty's paw beside the clasp, and below is a picture of the clasp.  You see that little circle in the right num-chuck (not sure that is the correct terminology)?  Well, thats the tiny little screw that you have to screw and unscrew in order to tighten your wire to the clasp!
Crazy small screws! I got out the screw driver kit my dad gave me when I moved out, and they had some pretty small screw drivers in there that are less than 1mm wide, but thats way too big still.  I was not intending to go to the craft store and pick up another screw driver before starting my project so I searched the house, and luckily found scalpels!  So I used the thin end of the scalpel to unscrew the screw!  SUCCESS!  Right?

I quickly put in the wire and now its time to rescrew the miniature screw.  So I grab the miniature screw and it took 10 suspenseful seconds to place the screw in its hole.  I reach for the scalpel and gently jab the screw with the scalpel, and OH MY GOODNESS I GUESS I JABBED TOO HARD because the tiny screw rolled off the table and being smaller than a grain of dandruff that thing is gone into the abyss.  There goes a 2 dollar clasp!  Thank goodness the package was 4 dollars for two because I am really not heading back to the store on a note of defeat.

http://www.etsy.com/listing/85740864/glistening-compass-bracelet?ref=v1_other_2
So I completed my bracelet with the second clasp in the package.  Then I went to shop and found that the company that makes these clasps has also manufactured little tiny screw drivers to prevent the beading world from haphazardly playing with scalpels.  And guess what?  The screw driver comes in a package with 6 spare miniature screws!  What a day!

Tuesday, November 8, 2011

Playing with Hemp

I love colors.  So I decided to buy a bunch of colored mother-of-pearl beads to make bracelets or something fun.  Because I prefer more natural materials I decided to buy a bunch of different colored hemp to experiment with.
Stringing beads to make it a bracelet seems so much easier than it actually is and I am just finding that out after having spent way too much money on beads thinking it would be easier!  I always thought, "Okay, just get some beads, get a string, string them and then put a clasp on the end.  Easy peasy." ... I guess in reality that really is just that but it really TRULY is a lot more difficult that it seems.

Perhaps my decision to string with hemp is what made the stringing process so difficult because of how much it frays!  Turns out there are some things to consider about hemp, and that there is more to consider when choosing a stringing material than just what seems pretty. So here are some thoughts and tips I have for those considering hemp:

http://www.etsy.com/listing/85566559/colors-galore?ref=v1_other_1

There is colored hemp and uncolored hemp; guess which one looks funner?  The thing with colored hemp is that the coloring process actually weakens the hemp and so it is recommend to use uncolored hemp along with colored hemp to strengthen your jewelry.  As for the bracelet above, I used uncolored hemp to string it, but because I am clumsy and I wanted to make it extra durable I actually strung in an unnatural clear string along side the hemp!

Hemp makes stringing beads difficult because it frays pretty much on contact.  I tried licking the tips to make it come back together.  After my mouth got dry I tried dipping it in a glass of water.  Doesn't work.  And by the way, putting water on your hemp is not good for the hemp - makes it less pretty. I also kept cutting the string to create a neater unfrayed end only to find I would eventually end up with a tiny baby bracelet.  Maybe someone out there has better advice for working with hemp but speaking only from trial and overnight experience I have discovered that this is the only thing that worked for me:
1) Put a piece of clear tape at the end of the hemp.
2) Twist the hemp around inside the tape so that the curls become tighter.
3) Keep twisting and twist off the piece of tape.
4) Then use your finger tips to twist the hemp end into a  finer tighter tip at the end.
I found that the little bit of glue from the tape really helped hold the hemp tips together and kept it from fraying while trying to put the thread through the beads.

After discovering the little bit of glue helped, of course I went to experiment and tried using super glue (Why?  Because its the most gung-ho of all glues).  DO NOT DO THAT!  Not only does the super glue get all over your finger tips making them rough like a construction man's, it also gets all over your nails, and everything else if you are clumsy like myself.  If the super glue gets on your beads it makes your beads look less shiny - and gracious forbids that that happens!  And lastly, don't do it because it doesn't work.  It makes the end of your hemp really rough and hard and poofy - so its actually even more difficult to get it through the bead hole especially if you have natural beads that sometimes have corners inside that tiny bead channel.

Lastly, I read somewhere that you can use bees wax to decrease fraying and to keep your hemp looking pretty.  I personally will never tried that because I will break out in hives from bees wax but please leave comments on whether bees wax works for you, or what other methods you have to keep your hemp from fraying.


Monday, November 7, 2011

The Artsy Bone

I was not born with an artistic or creative bone, but over the past couple of years I have developed an itch to do artsy things because of unexpected run-ins while shopping.  I have somehow ended up where I am now: often having the inkling to bead or sew something.  And thus this blog is created because I now wish I get new ideas and share my ideas for projects.


I think this all started when I moved into my current duplex where I needed an extremely small curtain that I could not find but instead had to make on my own.  My aunt brought me to a fabric store where I found my love for looking and feeling the different patterns and textures of fabrics.  I needed up buying some cheap burlap and used a hot glue gun to put together my little curtain: no sewing needed!


But then my aunt built on my interest of fabrics by bringing me to more fabric shopping and lunch dates, and very soon I was hooked.  I started with making a simple pillow that required sewing one long straight line, flipping it over, and then just tying the ends off with ribbons.  Then I moved to sewing matching curtains which required sewing 4 long straight lines.  And then it got more complex as I experimented with ruffles, trimmings, and et cetera.  I still have long ways to go.


That started a year ago.  Beading only came to me two weeks ago.  I was at dinner with my friend's parents who came into town, and her mom had just gone to a jewelry show.  My friend's mom said a few things about the jewelry show at dinner so my friend and I decided to go the next day.  We went to the jewelry show expecting to come out with some necklaces and bracelets, but instead - maybe we started at the wrong end of the show room - we were not able to find any pre-made necklaces and bracelets, instead I found myself spending over 300 dollars on just beads.  Why?  Because I do love shopping and buying pretty things even if I would not know what to do with them.  So the 300 dollar worth of beads sat in my cupboard for a couple days until my guilt of spending money on irrelevant things got to me and I got up and bought more art supplies and started making necklaces and bracelets.  I was immediately hooked!  There are so many different clasps and threads and beads and colors and textures.   Extremely exciting stuff!


So here I am!  I'm ready for you beading world!  I will try to post what I have been doing and PLEASE if anyone is reading my blog, PLEASE SEND ME comments and ideas of where to explore in the beading and sewing world!  ARTSY PEOPLE OF THE WORLD PLEASE INVITE ME TO BE ARTSY TOO!