Showing posts with label Craft. Show all posts

Wednesday, January 4, 2012

Love Gloves

http://www.etsy.com/listing/88109756/love-gloves
Oooh Valentines day vs Mardi Gras.  The two days are so close together this year - Valentines day is on the 14th of February as usual, and Mardi Gras (being the fat Tuesday before lent starts on Ash Wednesday) is falling on the 21st of February this year.  Decorating for Valentines day before February is really too early and most people do put up Mardi Gras decorations right after they start taking down Christmas stuff...

ANYWHOOOO, I guess we'll talk about decorations another day anyway when my love and interest for knitting and crocheting dimmers a little.


This time, I made GLOVES.  Love gloves!  Because its winter and we need warmth, because there is lots of love surrounding the holiday season even though it is currently in between Christmas/New Years and Valentines/Mardi Gras.  And because I really do love things that rhymes.

I know my last blog title was "Cheers to Knitting" (which I changed to "Cheers to Yarn" on Jan 4, 2012 because someone sent me a private message about how improper it was to include "knitting" in the name when the item really was crocheted...  my apologies if I offended anyone ) when I actually crocheted the slipper, now this project I actually DID knit!  I got the cool colors by knitting a string of red yarn and a string of grey/multicolored yarn at the same time!  And so the patches of colors is the natural pattern of when which color decided to be on the top side.

I didn't knit the fingers or thumbs because it is truly too warm in the South for that to seem like a practical thing for me to make... But I think that will be my next project - to figure out how to knit a glove with fingers and thumbs.  I like to figure out my own patterns, and when thinking about how to make gloves, it seems like I have to knit or crochet little finger-sized pockets and attach them to the top of the gloves... AKA a lot of work!  I am sure it will be fun though!  I wonder which movie I will be watching while knitting all those little digits!


Tuesday, December 6, 2011

Gingerbread House Party


Making gingerbread structures (houses, trains, gingerbread men) is so fun and festive!  It smells great, tastes great, and looks great no matter how much artistic talent you have!

So I had a couple of friends over (Jared and Christina):  I made some eggnog, and while that cooled in the fridge we went to Michael's to pick out our kits and candies.  Christina and I each got a Wilton mini-village kit while Jared got the Duff gingerbread house (I ended up buying 2 Duff gingerbread house kits myself so I can make a village).


Because the kits all included very cheap and very few bland-looking candies, we actually used quite a bit that were not included in the kit to make our houses look the way they do.  We bought pre-made white, pink, and green icings - too lazy to make our own when taste does not matter.  We bought small candy canes, mini candy cane icing candies, red and pink sprinkles, and gingerbread man sprinkles.


The Christmas tree lights were on, we have our eggnogs, and played Home Alone and Elf in the background while we decorated.  After those two movies were over, I was still not done my five mini-houses though, so we put on a The Happy Elf (because it was streaming on Netflix), but we rated that one star because it was horrible.


First to finish was Christina.  Her houses were all very adorable.  While putting together our houses, we both initially thought the boxy house with the flat roof looks like an outhouse.  But once decorated, both our outhouses actually turned out really cute.  We both had a lot of trouble with the triangular house because it was difficult to handle without mushing your roof design or having the front and back of the house pushed in together.   I love all her houses, but I do think my favorite is her candy cane roof!  Its a miniature pile of candy canes, as much as would stick and pile on top of the little roof.  It looks very merry.


Jared finished second.  His house was really difficult to build (and I say this from experience after working with my two Duff kits).  The kit came with a cardboard that you have to build your house on top of because the cardboard had slits that helped hold the base of the house together.  Without the base I don't think the house would actually stay up because the heavy slanted walls and heavy large roof is quite challenging to glue together with icing that takes around 45 minutes to really solidify and hold.  I think Jared actually put together the base of the house then waited while watching the first half of Home Alone because he is an engineer and foresaw that the roof would just cave and fall into the house if the base was not strong enough. But even though he waited around 45 minutes before he put the roof on, his roof still fell in while he was decorating.

I actually originally only bought one Duff kit, but my roof caved in about 5 times making me like the house less because every time you re"glue" it there is a giant smear of icing on the gingerbread.  So thats why I went and bought my second Duff kit so that I can make a more perfect house.  What I ended up doing with my first Duff house after the roof fell in five times was: 1) Put together the house base on one cardboard, decorate it.  2) Put together the roof on another surface, decorate it  3) Let the house base and roof dry overnight separately before sticking it together the next day.

My second Duff house is currently drying top and bottom separately, and I will be putting it together tomorrow.  So pictures of my Duff houses will come on another day.
 
http://www.etsy.com/listing/88076829/gingerbread-house-trio 
I am not sure whether you can tell from this picture, but the one on the far left is the house that looks like an outhouse when it was first built, but at the end it turned out to be one of my favorites of my houses.  I used candy canes to build a heart on its backside!   My Etsy posting has more pictures of these three houses so could see more pictures of them if you like.  I loved making the snowy roof!  It is really simple and it looks so wintery: You just get your white icing in an icing pouch with a simple round tip, and you squirt, drag, and pull fast to make the points.


Once again, the triangular house that aggravates me.  The faces of the house did not even fit the roof properly!  But I still love it =)  Cookies piled with icing piled with candies just look festive,  yummy, and cute no matter how poorly it seemed to have worked!

Oh and here is the Eggnog recipe:

Ingredients

  • 2 cups milk (I actually used 1 cup whole milk and 1 cup heavy cream because I ran out of milk.  It was delicious.)
  • 2.5 whole cloves
  • 1/4 teaspoon vanilla extract
  • 1/2 teaspoon ground cinnamon
  • 6 egg yolks
  • 3/4 cups sugar
  • 1 1/2 cups whiskey
  • 2 cups heavy whipping cream
  • 1 teaspoons vanilla extract
  • 1/4 teaspoon ground nutmeg

Directions
  1. Combine milk, cloves, 1/4 teaspoon vanilla, and cinnamon in a saucepan, and heat over lowest setting for 5 minutes. Slowly bring milk mixture to a boil.
  2. In a large bowl, combine egg yolks and sugar. Whisk together until it looks light and fluffy. 
  3. Whisk hot milk mixture slowly into the eggs. Pour mixture into saucepan. Cook over medium heat, stirring constantly for 3 minutes, or until thick. Do not allow mixture to boil. Place in fridge and let cool for about an hour.
  4. Stir in whiskey, heavy whipping cream, 1 teaspoon vanilla, and nutmeg. Refrigerate before serving chilled.  It will taste even better if you wait overnight for the spices to really come out.

Friday, November 25, 2011

Thanksgiving Day!


Oh I love Thanksgiving!  I spent it with my awesome boyfriend and his amazing family!

So since I've known his family, it seems like this is their their Thanksgiving tradition:

1.  Macy's parade is on the TV, and we pay special attention to the dog show.

2.  Huge, yummy, crazy awesome, food-coma-inducing lunch:  two turkeys (one fried one roasted), mashed potatoes, sweet potato casserole (with the crunchy pecans and brown sugar top), ham or roast duck (sometimes both), marshmallow and mayonnaise casserole, green beans with bacon, pineapple and cheese cracker casserole, cornbread dressing, dirty rice dressing, white rolls, homemade apple pie, store bought pumpkin pie, some other homemade pie.  Did I leave anything out?  Sounds around right for six people right?

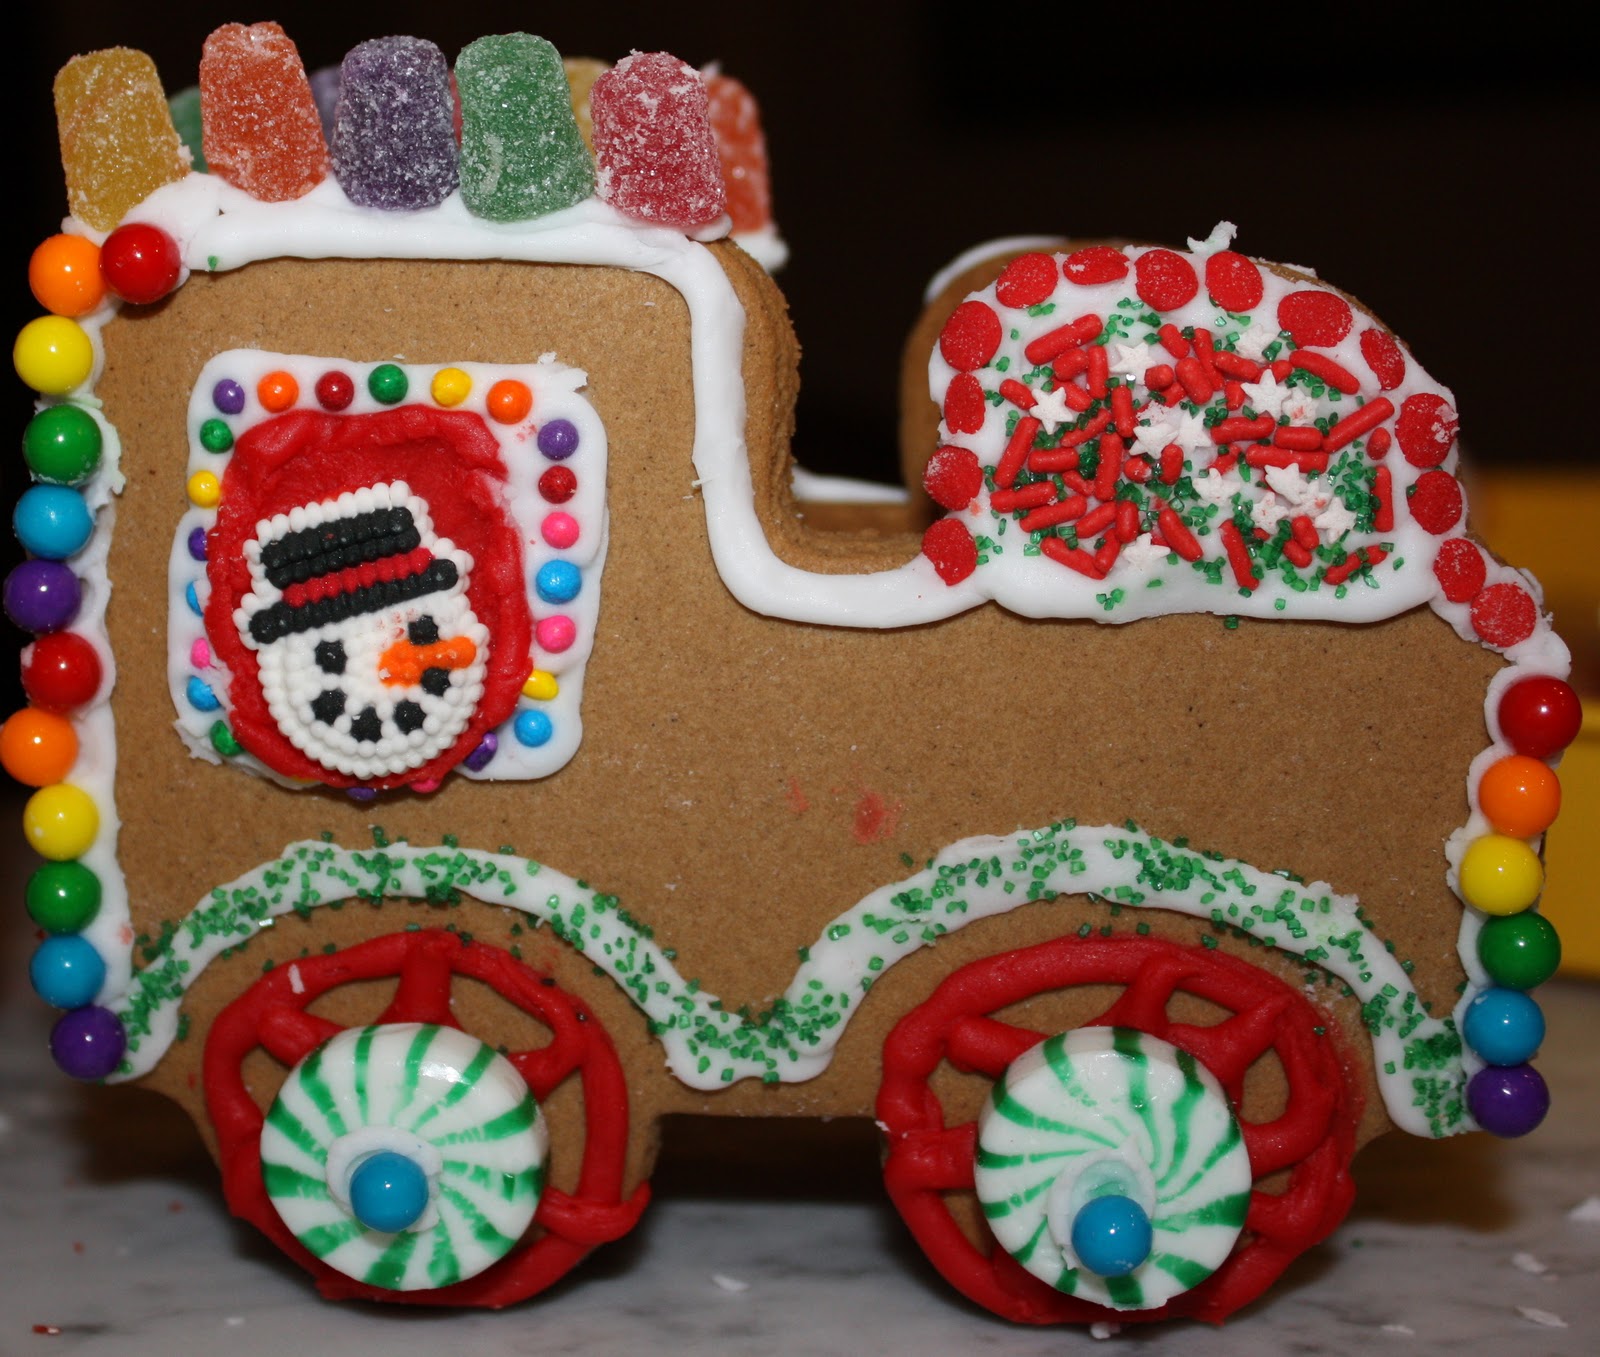
3.  Christmas decorating!  So part of this would be decorating gingerbread houses or trains.  I took over the train this year because when I am too stuffed to eat the cookies, icing, and candies, I still love playing with it!
These are the supplies Ms Sherry got us started with =) 
Yes, the gingerbread was pre-made (if you were to bake them on your own you have to ensure to bake them in advance to allow them to cool and harden prior to decorating and standing your train up.  The candy-canes were full of round and oval chocolates - which I did not end up using because they seemed bulky and heavy and I was afraid the icing would not succeed in holding them up.  But otherwise, the gingerbread train kit came with several mints, gummy candies, candy balls, and icing.  I did not personally taste any of this because I was very full already, but I was told the cookies were tasty!

The first car:


Since these are the first cars that I made, there is still some experimenting involved because its been a year since I last decorated gingerbread!  My biggest problem with these first two cars were that my hands were not quite warm enough and thus my icing was cooler than it should have been - meaning it solidifies a lot faster.  In this case, if you do not stick on your candies fast enough the icing will just crack when you place the candies on!  I  quickly learned that I have to "massage" my pouch of icing a little longer so that I have more time to decorate with candies before the icing solidifies. Of course you do not want to warm your icing up too much because if it is too runny it will not allow you to form well-defined lines.

The second car:  


The red and green backgrounds were done with the colored icing sugar crystals in the jar of icing (use a knife to spread a thin layer of icing on the gingerbread and then pat down some colored icing sugar crystals to the area).  The ornaments on the green car were merely pre-made sugar "stickers" that you can stick to your car with icing sugar.  The wheels are once again mints with a candy placed in the middle to make the axle.

The third car

The little Christmas trees on the tip-tops are one of the sprinkles that comes in the bottle of sprinkles separate from the gingerbread train kit.

The presents are once again pre-made sugar "stickers"

Its very tempting to start building the gingerbread house/train/whatever the first thing after opening the packaging but do try to refrain from sticking the sides together to stand up the cars until AFTER you have decorated each side! - Much easier this way because you can look down flat at all your sides while you decorate, and your candies won't slide down before the icing sets.  

After you do finally build the structure and stick it together, make sure you let the gingerbread structure rest in place for a while before you move it.  And If you intend on keeping your gingerbread as a decorating for more than one season (and of course if you have no intentions on eating it), then you can spray it with shellac (you can buy it from the craft store or Home Depot) so that the structure and color preserves.  Make sure you do your shellacking outdoors in a well ventilated area because that smell is not pleasant (nor is it salubrious)!

4.  The last thing in the Thanksgiving tradition: SHOPPING!!!  (on Black Friday... and that is why I did not blog about this yesterday when I actually made this!)  Hope you caught some great shopping deals!  And of course, check out my lil-shop if you like my stuff:  http://www.etsy.com/shop/HandMadeByEle

Thursday, November 10, 2011

Playing with Wires

So I just spent several days compiling a big shopping list, loading my virtual shopping cart and finally checked it all out yesterday.  Now all I have to do is wait for my big box to arrive before having more things to experiment with.  Meanwhile, I still have that little box of limited start-up jeweling supplies that I bought a couple weeks ago.  Thus, the topic of today will be wires!

I am really liking wires.  They are colorful, doesn't fray, shiny and makes the jewelry pop!  And I imagine it takes a lot for the wire to fade so your jewelry will keep its color and luster.  I lucked out when I chose this one-tool-does-all thing when I bought this pliers/round-nose/wire-cutter/loop-closer tool when I haphazardly selected what I should include in my start-up stuff.


This is my first wire bracelet:  I think it looks pretty cool even though the lack of views on my Etsy account fails to support my opinion!  And its neat because the wire will let you bend and readjust the bracelet size with a 2cm leeway yet the pattern and overall shape of the bracelet will stay intact.


http://www.etsy.com/listing/85810444/wirey-friendship-bracelet

Perhaps there are other tools out there that I still need, or maybe some metal gloves because as awesome as that tool works, my finger tips are still a little bit sore after making several bracelets


So now I am just waiting for my half-hard wire to arrive so that I can start making shapes, letters, and names with wire!  Keep checking back because things will get more exciting when my big box arrives!