Showing posts with label Etsy. Show all posts

Tuesday, January 31, 2012

The Unclaimed Cake

I am nervous!


This began about two weeks ago when my coworker asked for suggestions of where to find a cowgirl-boot-shaped birthday cake for her daughter.  Me, loving baking and eager to find an excuse to bake a project (not just a snack!) - I have offered to bake the cake.

I went out to different stores to try to find a boot-shaped cake mold,... but of course there is no such thing!  Party City had Hello Kitty (which I was tempted to buy anyway), Michaels had Dora the Explorer, Berings had very nice regular boring shaped pans, and same with Bed Bath and Beyond.  Why is it that in the state of Texas I can't find a cowboy boot shaped cake mold?  Seems like I should have been able to find it at any random gas station or grocery store.

So I revamped my plans and bought a giant rectangular baking pan to make a giant sheet cake that I can cut into the shape of a boot myself.  That worked out really well and now I have a lot of cut-off cake I can pig out on!

What I did not expect was that I had to run out to the store five times during the baking process because this being the first time I made a sheet cake I was not prepared for the amount of food I needed.  I used eight sticks of butter just in the icing.  I baked the Red Velvet Cake recipe I usually use for my boyfriend's birthday cake, and it makes a large three-layer cake that a family of 5+Me would take days to finish - and I found out I had to make double THAT amount in order to make a two layer sheet cake!  Don't take me wrong, I am not complaining, I really enjoy baking!  I am just saying, be warned of what you need if you ever plan on baking a sheet cake.


Cake crumbles when you ice it, so I like to put a thin layer of icing to "prime" the cake before I ice it so that you don't see the crumbles on the cake.  But sliced cake (because I had to slice it into a shape of a boot) really REALLY  crumbles.  So I actually had to ice the cake in three different layers.  Then on the top I made a glaze with icing sugar, meringue powder, and food coloring to decorate so that it looks nice and pretty and shiny!  I did not go with fondant because I personally do not like the taste of fondant and neither does anyone I have spoken with... But I have to admit fondant does make a cake look very pretty!

So why the "Unclaimed Cake"?  Because my coworker was supposed to pick it up today, I do not have her phone number, and its already 7pm.  Has the cake been abandoned?  My first pretty-cake project... has it been given up on?

Sunday, January 22, 2012

How I Love King Cakes

http://www.etsy.com/listing/86479220/large-king-cake-with-cream-cheese
I acquired my love for King Cakes when I went to visit my Louisiana born-and-raised boyfriend in Baton Rouge during Spring Break 2007.  It was right around Mardi Gras, and we saw the stacks of King Cakes at Whole Foods while grocery shopping for a romantic picnic we were having on the LSU lakes later that night.  Honestly, I thought it looked disgusting!  I usually hate cakes with white icing and THEN artificially colored sugars on top making the cake WAY too sweet.  But he told me the history behind King Cakes and stressed the importance of me at least trying it in order to have a full Louisiana Mardi Gras experience.

The thing is, after Christmas decorations come down, people start decorating and anticipating Mardi Gras.  During this in-between-holiday-time, King Cakes are the thing to share with your friends and family!  Inside every King Cake, there is a little Baby Jesus - whoever gets the Baby Jesus in their slice of cake has to bring the next King Cake!

Long story short, we brought the King Cake home - the messy looking, overly sweet looking, flimsy paper box of grocery-store cake.  "I just want a tiny sliver..." I am pretty sure I shivered a little before tasting it.  But guess WHAT!?  Even the grocery store version of this cake was awesome!

http://www.etsy.com/listing/86479220/large-king-cake-with-cream-cheese


Its not REALLY a cake you see:  Under the sugar and icing is a crunchy-on-the-outside-but-soft-on-the-inside braid of bread (also called the brioche).  The bread is not very sweet at all - in fact, if you eat it on its own its almost bland.  The bread is actually six strands of bread braided together with cinnamon sugar shoved in between the strands.  Then the cake is topped with a white icing and then the colorful sugars.  The end result: not overly sweet!  The perfect dessert.

Whats even better is whats in between!  You can choose different fillings: different flavored jellies or CREAM CHEESE!   Clearly I think the cream cheese filling is the way to go.  The tanginess and saltiness of the cream cheese just adds a whole different complexity to the sensation on your taste buds.

Oooooh yummy!  And to top it all off, there is the little Baby Jesus inside.  Traditionally, the Baby Jesus is not plastic, it was a red bean!  Whoever got the bean was the "King of the Ball!" and got to throw the next Mardi Gras Ball!  But seeing as how "balls" are still so popular, the modern thing is that whoever got the bean gets to bring the next King Cake!

Wednesday, January 4, 2012

Love Gloves

http://www.etsy.com/listing/88109756/love-gloves
Oooh Valentines day vs Mardi Gras.  The two days are so close together this year - Valentines day is on the 14th of February as usual, and Mardi Gras (being the fat Tuesday before lent starts on Ash Wednesday) is falling on the 21st of February this year.  Decorating for Valentines day before February is really too early and most people do put up Mardi Gras decorations right after they start taking down Christmas stuff...

ANYWHOOOO, I guess we'll talk about decorations another day anyway when my love and interest for knitting and crocheting dimmers a little.


This time, I made GLOVES.  Love gloves!  Because its winter and we need warmth, because there is lots of love surrounding the holiday season even though it is currently in between Christmas/New Years and Valentines/Mardi Gras.  And because I really do love things that rhymes.

I know my last blog title was "Cheers to Knitting" (which I changed to "Cheers to Yarn" on Jan 4, 2012 because someone sent me a private message about how improper it was to include "knitting" in the name when the item really was crocheted...  my apologies if I offended anyone ) when I actually crocheted the slipper, now this project I actually DID knit!  I got the cool colors by knitting a string of red yarn and a string of grey/multicolored yarn at the same time!  And so the patches of colors is the natural pattern of when which color decided to be on the top side.

I didn't knit the fingers or thumbs because it is truly too warm in the South for that to seem like a practical thing for me to make... But I think that will be my next project - to figure out how to knit a glove with fingers and thumbs.  I like to figure out my own patterns, and when thinking about how to make gloves, it seems like I have to knit or crochet little finger-sized pockets and attach them to the top of the gloves... AKA a lot of work!  I am sure it will be fun though!  I wonder which movie I will be watching while knitting all those little digits!


Saturday, December 31, 2011

Cheers to Yarn!

http://www.etsy.com/listing/89435235/toms-inspired-knitted-slippers

No I have not given up blogging or my hobbies surrounding HandMadeByEle.  I have been sick and living on the couch with regular visits to the bed, doctor, and pharmacy.  For that reason, I have not been feeling well enough to compose and stare in front of a computer screen (even though its really beautiful).

Now, still sick, but feeling relatively okay and very unproductive from 1.5 weeks of sitting on my butt I am going to write a short posting while holding down my sick feeling by sipping on homemade ginger ale sweetened with brown sugar and love (because the ginger ale was made by my lovely boyfriend).

So while waiting 15 minutes for my prescription to be filled at the pharmacy, I decided to do some therapeutic healing therapy: shopping around Walgreens.  Since I was anticipating needing some prolonged couch time, I decided to buy a cozy blanket, some knitting and crocheting needles, and 13 balls of different colored yarn - yes, I decided in those 15 minutes of waiting that I am going to start a new hobby and I am going to like it.


So I watched a video online and learned how to crochet.  I don't understand how you read the crocheting patterns and with my headaches I do not feel like reading about how to decipher how to read those patterns, so I picked up my Tom's shoes and decided to crochet in the shape of my shoe and adding and subtracting stitches where I see fit.  I think it turned out rather well.

For the sole, I sewed together 4 layers of pink cotton - so these are Tom-inspired slippers.  I wonder if there are places were I can buy a regular rubber sole to attach my own shoe onto?


Overall, I would say they are a success.  Only thing is, when they are knitted, they feel more loose than the Tom shoe fabric, so next time I will make my the shoe slightly smaller than what I usually wear.


Friday, December 9, 2011

My Santa's Workshop

http://www.etsy.com/listing/88296188/gingerbread-santas-workshop


Oooh I spent many hours making this!  One of my proudest gingerbread work yet.


This one of the sides.  I used colorful twizlers for the roof!  Extremely adorable.


The is the other side.  Stacks of present with a gummy roof.  I love the heavy snow at the roof base.


This is the back side.  Snowflakes on a pink rooftop - how much merrier could Christmas be!  And I love the miniature Christmas ornaments that are on the front and back of the house!  I found them at Michaels, they were actually wine glass ornaments but I unbent the metal loop and used it as an ornament hook to hook around the house instead!  Adds a little something to the house.


<3  <3  <3


Wednesday, December 7, 2011

Homemade Gingerbread Men

http://www.etsy.com/listing/88109756/gingerbread-hawaii-couple?ref=v1_other_1


Enough of that store bought stuff!  Time to make some gingerbread on my own and make some ornaments!

I started off by trying to find a recipe online for a tough cookie that would hold up even if I dropped the ornament.  But after the highly-rated recipe gave me a giant pot of crumbly dough, I decided to do my own thing.

I am proud to say that my recipe created tough cookies perfect for ornaments: I had left some cookies outside for 2 seconds thinking it would dry faster there than in my kitchen.  I put them outside, went inside, and though "Oh no, the neighbor leaves his dog outside and she might smell it and come eat it." I turned right around and surely enough the golden retriever was biting at one of my tree ornaments.  The ornament got wet but remained intact.

AND it truly smells deliciously Christmassy!


So here is the recipe:

Ingredients:


- 1 cup shortening
- 1 cup sugar
- 7 cups flour
- 1 tablespoon cocoa
- 1 1/2 tablespoon cinnamon
- 1 1/2 tablespoon nutmeg
- 1 teaspoon baking soda
- 1 cup molasses
- 1 cup dark corn syrup
- 1/2 cup water if necessary
- cookie cutters


Directions:

1. Cream shortening and sugar in a large bowl or a big pot.

2. Add flour, cocoa, cinnamon, nutmeg, baking soda, molasses, and dark corn syrup into the mixture and mix well.  Instead of 1 1/2 tablespoon cinnamon and nutmeg, you can do 1 tablespoon each of cinnamon, nutmeg, and ground cloves.  Now you have to get your hands dirty and just knead the Christmassy dough with your hands to get it nice and clumped together.

3.  Lastly, add the 1/2 cup of water gradually as necessary to form the dough into a giant clump.

4.  Wrap the dough up in wax paper and refrigerate until cold (roughly 3 hours).

5.  Preheat oven to 350 F.  Line cookie sheets with aluminum foil.

6.   Remove the dough from the refrigerator and use a rolling pin to roll out the dough into an even 0.75cm thick layer.

7.  This step may seem a little different from usual cut out cookies:  Use a cookie cutter to cut into the layer of dough, leave the cookie cutter in the dough and remove the dough around the cookie cutter.

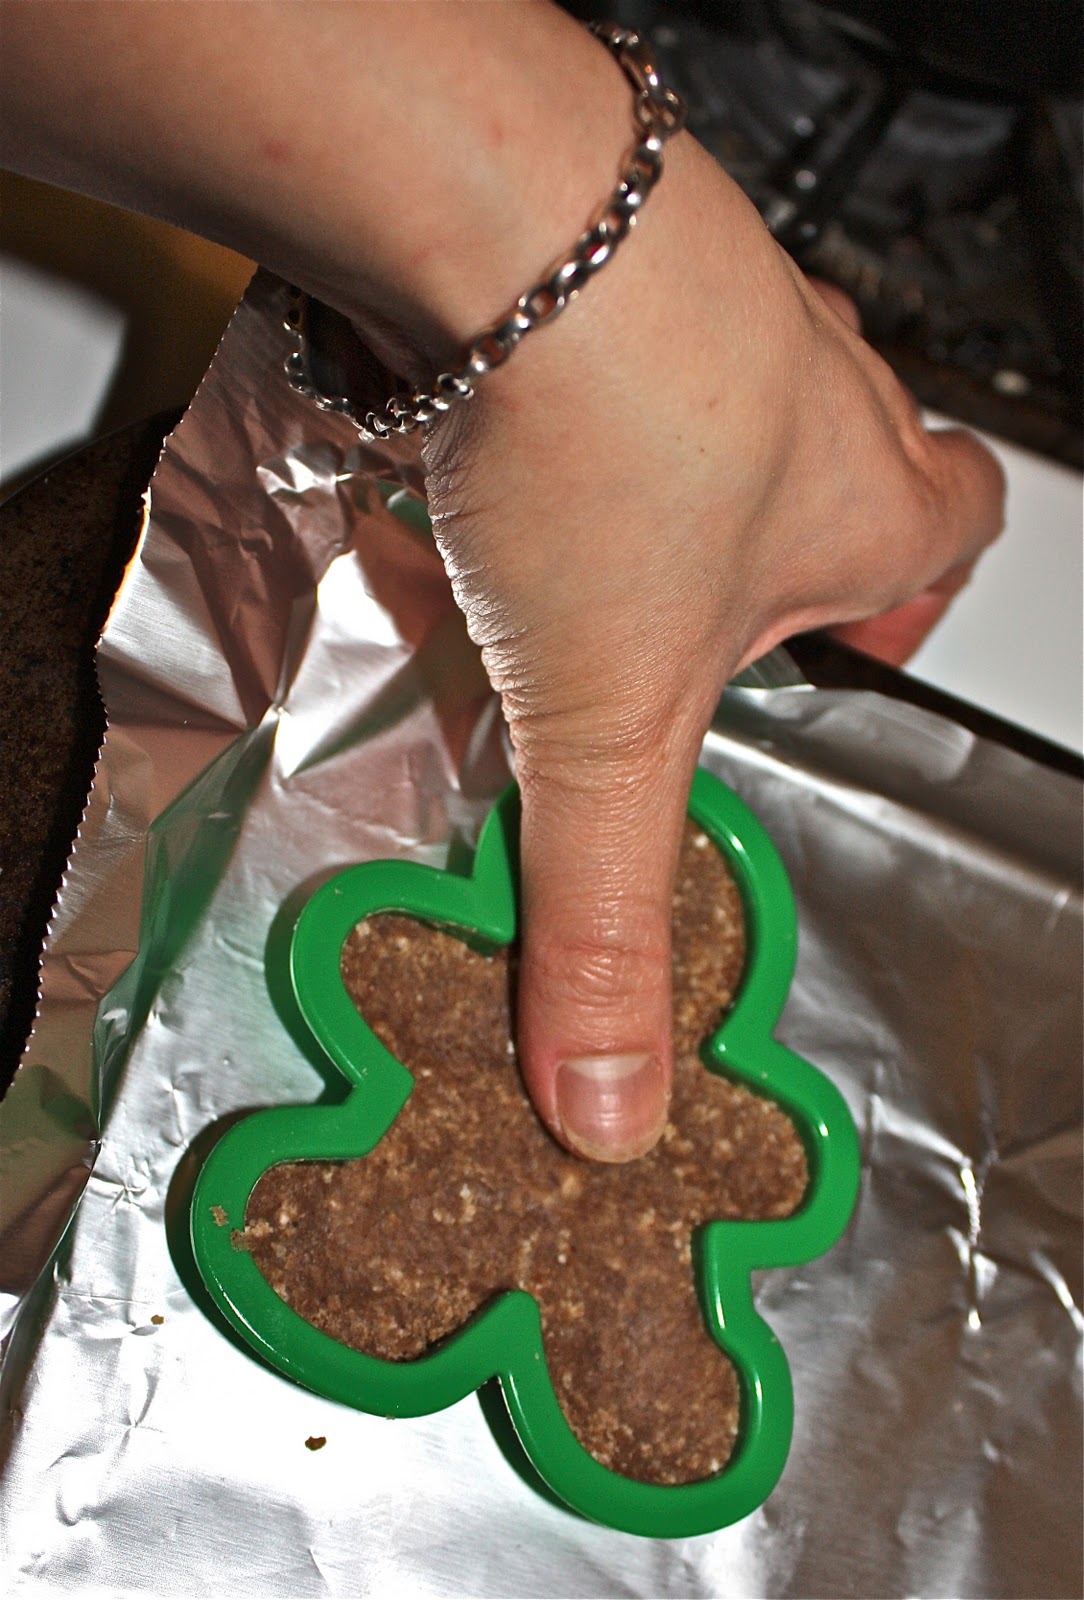
8.  Transfer the cookie dough and the cookie cutter together to your aluminum foiled cookie sheet.  Using your thumb, press down firmly  and evenly throughly the cookie to make your cookie extra tough.

9.  Use a chopstick or straw to make a 3mm diameter role on your cookie.

10.  Remove the cookie cutter carefully from your cookie.

11.  Bake 25-30 minutes.  (I baked mine for 30 minutes because my oven is not very good and so I think it is always slightly cooler than I set it to.  But just peek to see how it looks, and it should be done between 25 to 30 minutes).

12.  Let cool on the cookie sheet for 10 minutes before transferring to a cookie rack.  Let cool on cookie rack for 2-3 days to ensure cookie is hardened before you decorate it.


Really, its probably edible if you baked it less long and let it be softer. It might even taste good, after all its made of sugars, syrups, and shortening!

To decorate, you can use different colors of icing - buy it pre made or make it yourself.  I usually just buy it pre made when I do not plan on eating it because it tastes better when you make fresh icing yourself.

Michaels and Party City also has a huge variety of icing sugars:  Little candy canes, mistletoes, little gingerbread men, Christmas trees, colored dots.  You can also use candies:  chocolate chips, M&Ms, candy canes, Jellybeans.  Household items: ribbons, buttons, miniature toys.


They are so much fun to make and look at!  Have fun!


Tuesday, December 6, 2011

Gingerbread House Party


Making gingerbread structures (houses, trains, gingerbread men) is so fun and festive!  It smells great, tastes great, and looks great no matter how much artistic talent you have!

So I had a couple of friends over (Jared and Christina):  I made some eggnog, and while that cooled in the fridge we went to Michael's to pick out our kits and candies.  Christina and I each got a Wilton mini-village kit while Jared got the Duff gingerbread house (I ended up buying 2 Duff gingerbread house kits myself so I can make a village).


Because the kits all included very cheap and very few bland-looking candies, we actually used quite a bit that were not included in the kit to make our houses look the way they do.  We bought pre-made white, pink, and green icings - too lazy to make our own when taste does not matter.  We bought small candy canes, mini candy cane icing candies, red and pink sprinkles, and gingerbread man sprinkles.


The Christmas tree lights were on, we have our eggnogs, and played Home Alone and Elf in the background while we decorated.  After those two movies were over, I was still not done my five mini-houses though, so we put on a The Happy Elf (because it was streaming on Netflix), but we rated that one star because it was horrible.


First to finish was Christina.  Her houses were all very adorable.  While putting together our houses, we both initially thought the boxy house with the flat roof looks like an outhouse.  But once decorated, both our outhouses actually turned out really cute.  We both had a lot of trouble with the triangular house because it was difficult to handle without mushing your roof design or having the front and back of the house pushed in together.   I love all her houses, but I do think my favorite is her candy cane roof!  Its a miniature pile of candy canes, as much as would stick and pile on top of the little roof.  It looks very merry.


Jared finished second.  His house was really difficult to build (and I say this from experience after working with my two Duff kits).  The kit came with a cardboard that you have to build your house on top of because the cardboard had slits that helped hold the base of the house together.  Without the base I don't think the house would actually stay up because the heavy slanted walls and heavy large roof is quite challenging to glue together with icing that takes around 45 minutes to really solidify and hold.  I think Jared actually put together the base of the house then waited while watching the first half of Home Alone because he is an engineer and foresaw that the roof would just cave and fall into the house if the base was not strong enough. But even though he waited around 45 minutes before he put the roof on, his roof still fell in while he was decorating.

I actually originally only bought one Duff kit, but my roof caved in about 5 times making me like the house less because every time you re"glue" it there is a giant smear of icing on the gingerbread.  So thats why I went and bought my second Duff kit so that I can make a more perfect house.  What I ended up doing with my first Duff house after the roof fell in five times was: 1) Put together the house base on one cardboard, decorate it.  2) Put together the roof on another surface, decorate it  3) Let the house base and roof dry overnight separately before sticking it together the next day.

My second Duff house is currently drying top and bottom separately, and I will be putting it together tomorrow.  So pictures of my Duff houses will come on another day.
 
http://www.etsy.com/listing/88076829/gingerbread-house-trio 
I am not sure whether you can tell from this picture, but the one on the far left is the house that looks like an outhouse when it was first built, but at the end it turned out to be one of my favorites of my houses.  I used candy canes to build a heart on its backside!   My Etsy posting has more pictures of these three houses so could see more pictures of them if you like.  I loved making the snowy roof!  It is really simple and it looks so wintery: You just get your white icing in an icing pouch with a simple round tip, and you squirt, drag, and pull fast to make the points.


Once again, the triangular house that aggravates me.  The faces of the house did not even fit the roof properly!  But I still love it =)  Cookies piled with icing piled with candies just look festive,  yummy, and cute no matter how poorly it seemed to have worked!

Oh and here is the Eggnog recipe:

Ingredients

  • 2 cups milk (I actually used 1 cup whole milk and 1 cup heavy cream because I ran out of milk.  It was delicious.)
  • 2.5 whole cloves
  • 1/4 teaspoon vanilla extract
  • 1/2 teaspoon ground cinnamon
  • 6 egg yolks
  • 3/4 cups sugar
  • 1 1/2 cups whiskey
  • 2 cups heavy whipping cream
  • 1 teaspoons vanilla extract
  • 1/4 teaspoon ground nutmeg

Directions
  1. Combine milk, cloves, 1/4 teaspoon vanilla, and cinnamon in a saucepan, and heat over lowest setting for 5 minutes. Slowly bring milk mixture to a boil.
  2. In a large bowl, combine egg yolks and sugar. Whisk together until it looks light and fluffy. 
  3. Whisk hot milk mixture slowly into the eggs. Pour mixture into saucepan. Cook over medium heat, stirring constantly for 3 minutes, or until thick. Do not allow mixture to boil. Place in fridge and let cool for about an hour.
  4. Stir in whiskey, heavy whipping cream, 1 teaspoon vanilla, and nutmeg. Refrigerate before serving chilled.  It will taste even better if you wait overnight for the spices to really come out.

Sunday, November 20, 2011

Beginning of Christmas Season

http://www.etsy.com/listing/86480428/snowflakes-and-candycane-hearts
So a  lot of people on Etsy have long ago already started selling Christmas stuff, so I figured I should try to make some Christmas-themed stuff too!  AND because I really love Christmas and has been looking forward to it since June!

I totally wish I could wear the Christmas jewelry but I can't start sporting Christmas stuff until after Thanksgiving!  I still have lots of glass candy cane and some pewter Christmasy charms that i have yet to work with, so there will be lots of Christmasy stuff coming out in the next few weeks.


http://www.etsy.com/listing/86479220/christmas-hempclay-bracelet?ref=v1_other_2
This blue snowflake bracelet however... 


I really do like this bracelet, but I can't seem to get a good picture of it.  I took so many pictures but this is the only one that came out all clear.  Something about the textures of the beads and how light bounties off of them is just not agreeing with me or something.  Until I can get a better I cannot post this item up because I just feel goofy posting pictures even I think are bad up on Etsy!

Tuesday, November 15, 2011

Visibility

http://www.etsy.com/listing/86121172/glass-mushroom-pendant-on-mother-of
So I have opened shop on Etsy for over a week now... I know from research that it usually takes a long times (at least a few months) before people actually starts buying your stuff, but I am annoyed that no one was even clicking and viewing my stuff.  I did a few changes in the last couple of days so now I actually have a few views and a few "admirers"!  I am very excited!  Knowing someone wanted to take a closer look and knowing someone appreciates something you made just really warms a person's heart!  Its good to have an affirmation that your art/creations isn't going unnoticed and isn't just swallowed by some giant void in the world wide web.  So here are some tips about increasing visibility so that you can get some warm fuzzeis too:

1.  Make sure your first picture (the one people see before they even click in) is very eye-catching: Ensure that you are zoomed in quite a bit so that people will want to click on your item.  Use bright colors, bright lighting, make it zoomed in and focused on the feature of your item.

2.  Use your tags: Even your friends you ask to check out your shop cannot find your items if you tell them to search your shop name on Etsy (something I think should be changed)!  So on your tags, make sure you include key words that people will search when they are online shopping.  Today I am experimenting with putting my shop name "HandMadeByEle" as one of my tag words, we will see how that goes!

3.  Be involved in the Etsy community:  Add people to your circle and give other sellers feedback if you love their items or love their stuff!  People will see that you added them to your list and they will in turn become curious about you and your shop.  I am not sure how other websites work but with Etsy the circles, favorites, and admirers really will help boost your visibility.

Good luck with your shops!

Saturday, November 12, 2011

First Impressions

http://www.etsy.com/listing/85578050/cherries-and-christmas


The above pictures are taken of the same bracelet.  The photos are taken with the bracelet on different backgrounds.  It wasn't until I have viewed my own items on Etsy amongst other Etsy listings did I know how horrible my photos were.   There are billions of listings on the website, and when I saw my own listing in the midst of the 20 other listing on the 10th page of items I thought "Oh my goodness, my stuff looks invisible even while in plain sight."

I guess until I started online selling, I didn't know how difficult it to was grab a buyer's attention because I buy so much stuff online so easily... Turns out there are billions of people trying to selling similar products online!  So to be viewed, that mug shot of your product better be  ATTRACTIVE or its beyond ignored.

I am sure I still don't have this photo taking science down because I am not getting many views on my items.  (Kinda a bummer!)  But within 2 days of starting to post stuff on Etsy I realized one of my hugest mistakes was to not zoom in enough on the product.

Most people are use to taking pictures to capture occasions and experiences.  So lets say you are traveling to Greece: You'd want a picture taken with a lot of the background visible to capture what you experienced during your trip, right?

Thats something you quickly have to realize to stop doing when you are trying to sell stuff online:  No one cares about the backdrop!  Kind of obvious why right - that you need to grab people's attention with the visualization of the actual item for sale?  Well, I didn't think of it until I glossed over my own items while online shopping.

So, my lesson number one was to ZOOM IN and FOCUS.  (Because we online shoppers are all too A.D.D. to do it on our own?!)


And then the second thing I learned about this type of photography is lighting.  Many websites I read have said that to get a great picture you must have lots of natural lighting.  But I somewhat disagree.


The above and below picture are the exact same picture: I took the picture of the bracelet indoors beside a well-lit window against a white cloth.  The above is the original photograph and below I increased the exposure and cropped it to zoom in more.

http://www.etsy.com/listing/85810444/wiry-braided-bracelet
Now, below is a picture I took of the same bracelet outside that same windows.  I found that it was too bright when I took the picture outside the same window - it casted too much shadow and actually took away the appeal of the bracelet.


I even tried playing with the exposure of the outside picture for a while but that turned out okay... 

In my opinion, the most attention-capturing picture of the purple bracelet was the second picture - when I took the picture indoors and increased the exposure to brighten it up.  I did this with several items and found that I still liked the picture the most when I took it indoors and just increased the exposure.  I think the pictures taken outside on a sunny day just features too large of a shadow making the picture "pop" less (for lack of better words).

My next experiment will be to try taking the picture outside on a cloudy day - maybe this will have a great effect too.

Thursday, November 10, 2011

Playing with Wires

So I just spent several days compiling a big shopping list, loading my virtual shopping cart and finally checked it all out yesterday.  Now all I have to do is wait for my big box to arrive before having more things to experiment with.  Meanwhile, I still have that little box of limited start-up jeweling supplies that I bought a couple weeks ago.  Thus, the topic of today will be wires!

I am really liking wires.  They are colorful, doesn't fray, shiny and makes the jewelry pop!  And I imagine it takes a lot for the wire to fade so your jewelry will keep its color and luster.  I lucked out when I chose this one-tool-does-all thing when I bought this pliers/round-nose/wire-cutter/loop-closer tool when I haphazardly selected what I should include in my start-up stuff.


This is my first wire bracelet:  I think it looks pretty cool even though the lack of views on my Etsy account fails to support my opinion!  And its neat because the wire will let you bend and readjust the bracelet size with a 2cm leeway yet the pattern and overall shape of the bracelet will stay intact.


http://www.etsy.com/listing/85810444/wirey-friendship-bracelet

Perhaps there are other tools out there that I still need, or maybe some metal gloves because as awesome as that tool works, my finger tips are still a little bit sore after making several bracelets


So now I am just waiting for my half-hard wire to arrive so that I can start making shapes, letters, and names with wire!  Keep checking back because things will get more exciting when my big box arrives!

Wednesday, November 9, 2011

Trials, Errors, and Creativity

Since I am only weeks into jewelry making, I am doing a lot of experimentations with different textures and products to find what would allow me to produce jewelry I could try to attempt to sell on my newly opened Etsy.com account.  I have only put on 5 of the 50 things I have made because .... *sigh*.... not everything is a winner!  My account is HandMadeByEle (are you shocked) if you are interested in taking a peek.

So today, I began to play with stainless steel wires.  The picture on the left looks blurry right?  Well, its not blurred: the wire comes wrapped up in plastic such that I had to carefully glide a pair of scissors through its entire length of 5 feet of wire to get to the stainless steel.  I don't understand the purpose of the packaging... if someone knows, please indulge me, thanks.

I had chosen these tiny little clasps to go on the ends of my wire for the bracelet I was making.  That is my 5 pound kitty's paw beside the clasp, and below is a picture of the clasp.  You see that little circle in the right num-chuck (not sure that is the correct terminology)?  Well, thats the tiny little screw that you have to screw and unscrew in order to tighten your wire to the clasp!
Crazy small screws! I got out the screw driver kit my dad gave me when I moved out, and they had some pretty small screw drivers in there that are less than 1mm wide, but thats way too big still.  I was not intending to go to the craft store and pick up another screw driver before starting my project so I searched the house, and luckily found scalpels!  So I used the thin end of the scalpel to unscrew the screw!  SUCCESS!  Right?

I quickly put in the wire and now its time to rescrew the miniature screw.  So I grab the miniature screw and it took 10 suspenseful seconds to place the screw in its hole.  I reach for the scalpel and gently jab the screw with the scalpel, and OH MY GOODNESS I GUESS I JABBED TOO HARD because the tiny screw rolled off the table and being smaller than a grain of dandruff that thing is gone into the abyss.  There goes a 2 dollar clasp!  Thank goodness the package was 4 dollars for two because I am really not heading back to the store on a note of defeat.

http://www.etsy.com/listing/85740864/glistening-compass-bracelet?ref=v1_other_2
So I completed my bracelet with the second clasp in the package.  Then I went to shop and found that the company that makes these clasps has also manufactured little tiny screw drivers to prevent the beading world from haphazardly playing with scalpels.  And guess what?  The screw driver comes in a package with 6 spare miniature screws!  What a day!